About Me

banner image

Featured

Learn How to Make Natural Soap For Face and Body


How To Make Soap

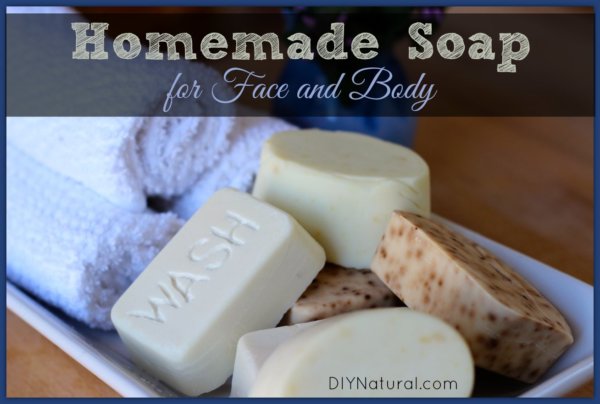
Learn how to make soap from veteran soap maker, Debra Maslowski. Her natural, homemade soap making process is simple, versatile, and teaches many every year!

How to Make Soap

Homemade soap making is my number one passion, so if I have a day to do nothing, I’ll just make it all day.
close
 
People always ask me how to make soap, so today I show you how I do it!

Master Soap Maker for 20+ Years

In 1994 I came across a book on soap making and thought, “Well, gee, it can’t be too hard.” I remembered my great grandmother from Sweden had made it, and so had my mother when I was much younger.
So I gathered my ingredients and set forth to make soap.

The First Batch of Homemade Soap

The first batch turned out great, then the next, but the next after that was a dismal failure. So what did I do wrong? I wasn’t sure, so I decided to take a class. I contacted the local adult education center and found the instructor had left the area. Would I be interested in teaching? I got talked into it and started the following January. I taught people how to make soap for a total of 11 years in Minnesota.
When I came to North Carolina in 2004, I had to hunt around a bit to find a venue, but ended up at a local college in 2007 and have been there ever since. I now teach classes on how to make soap, along with several other natural products. I also sell my soaps and other products online, at local tailgate markets, and at the state fair each year.

Soap Making: The Basics

Soap making can be very simple or you can make it as complicated as you like.
First, the beauty of making your own is that you can make it with the ingredients that you choose and the fragrances that you like. And adjustments aren’t hard but do take some practice. Further, most homemade soap recipes use ounces or grams and ingredients must be weighed to get good results. But I’ve found a way to simplify the process by converting the ingredients to cups and portions of cups. Consequently, it’s much easier and you get the same results time after time.

Lye in Homemade Soap

The one thing in homemade soap you can’t substitute is lye. You should always use 100% sodium hydroxide, or lye in crystal form. Don’t substitute liquid lye or drain cleaners such as Drano. These may cause inaccurate measurements or have bits of metal in them. You don’t want either.
Lye is caustic. It can eat holes in fabric and cause burns on your skin. Always be extra careful when using lye. Use gloves and eye protection and a mask if desired. When you mix the lye with water, it will heat up and fume for about 30 seconds to a minute. It may cause a choking sensation in your throat. Don’t worry, it’s not permanent and will go away after a few minutes. Always add lye to water (not water to lye), and start stirring right away. If allowed to clump on the bottom, it could heat up all at once and cause an explosion.

No Lye in Finished Soap

Even though lye is caustic and dangerous to work with, after it reacts with the oils in your soap (through a process called saponification), no lye will remain in the finished product.
The lye reacts with the oils, turning what starts out as a liquid into blocks of soap. When made properly, no lye remains in the finished product.[1]
(For more information, read our article: Can You Make Soap Without Lye?)

Homemade Soap Making Equipment

When learning how to make soap, remember to use equipment that will not be used for cooking. While you could clean everything really well, it’s best not to take a chance.
Stainless steel, tempered glass, and enamel are all good choices for mixing bowls. Don’t use copper or aluminum, they will react with the lye. Some plastics may melt, so don’t use plastic bowls.
For spoons, use styrene plastic or silicone. For molds, you can get soap molds at your local craft store or online here, or use silicone baking pans (like this). These are great because you can peel the mold right off. Other things you want to have are a pint and a quart canning jar, newspaper, a stainless steel thermometer that reads between 90° and 200° (find it here), an old towel, and any additions you want to add to the soap.

How to Make Soap: The Additives

There are as many variations of soap as there are colors in the rainbow. You can literally do almost anything. Here are the basics of additives:

Herbs

All herbal material must be dried. Lavender is popular, as well as chamomile. I love lemongrass and oakmoss, though not together. Use about ¼ cup of dried plant material per batch of this size. (Find high quality dried herbs here.)

Essential Oils

Essential oils are from plants. They come from the roots, stems, flowers or seeds. Fragrance oils can be blends of essential oils or they can be artificially produced. Be sure you know what you have. Most oils can be used at the rate of 15-20 drops or around a teaspoon per batch of this size. (Find 100% pure essential oils here.)

Colors

Natural colors are easy. Use cinnamon or cocoa powder for a brown soap, powdered chlorophyll for green, turmeric for yellow and beetroot for orange. However, sometimes things change colors, like magenta beet powder turning yellowish orange. I would avoid food colors since they don’t hold up well in soap. Check out our article, 44 Ways to Color Homemade Soap Naturally, for even more ideas.

Other Items

This would include aloe vera gel, oatmeal, dry milk powder, clays, cornmeal, ground coffee, salt and anything else you may want to use.
How To Make Soap 1
How To Make Soap
2 votes
PRINT

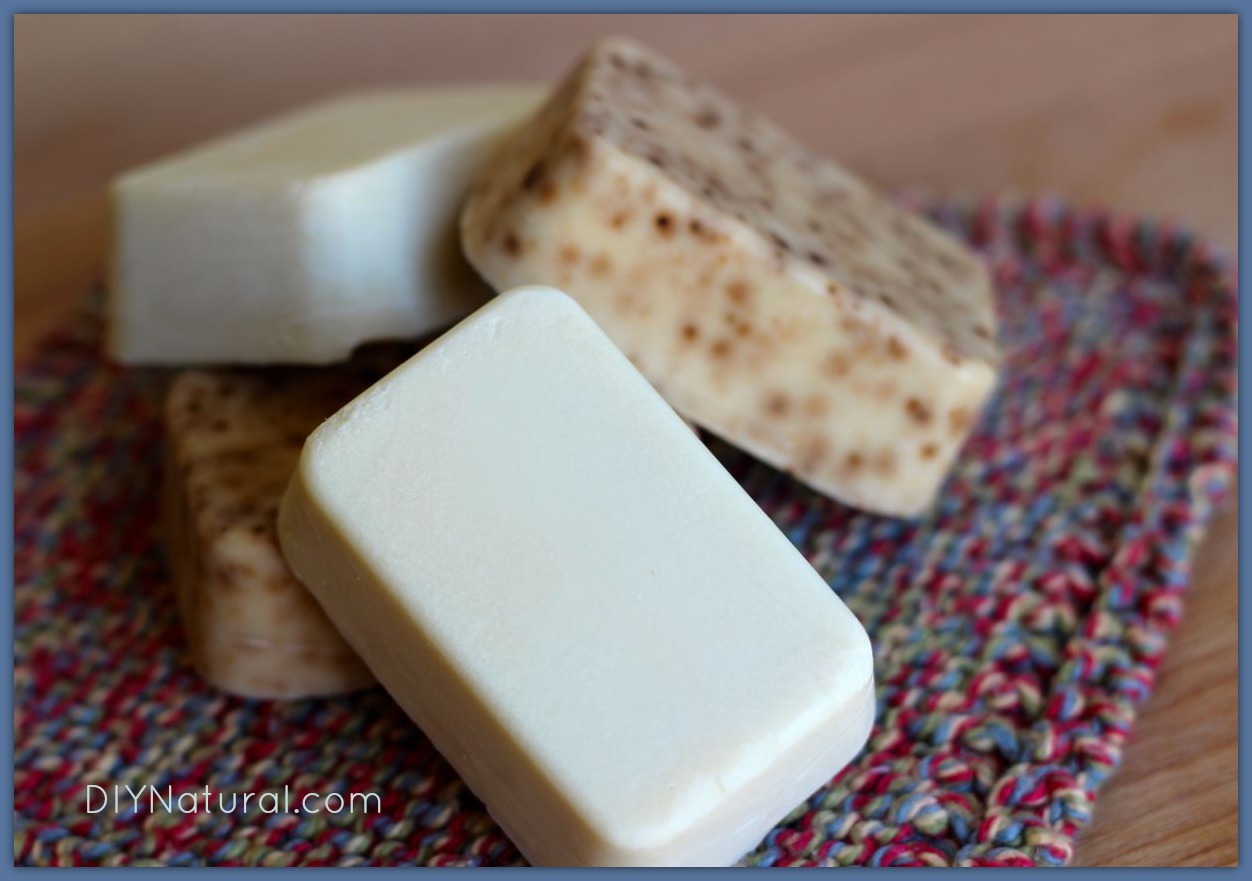
How to Make Soap for Hand & Body

YIELD 5 3.5 OUNCE BARS

Ingredients

  • coconut oil ⅔ cup – to produce good lather (buy it in bulk here for soap making here)
  • olive oil ⅔ cup – which makes a hard and mild bar
  • other liquid oil ⅔ cup – like almond oil, grapeseed, sunflower or safflower oil (find them here)
  • ¼ cup lye – also called 100% sodium hydroxide (find it here or at local hardware stores)
  • ¾ cup cool water – use distilled or purified (find the best water purification systems here)

Instructions

Step 1

Cover your work area with newspaper. Put your gloves and other protective wear on. Measure your water into the quart canning jar. Have a spoon ready. Measure your lye, making sure you have exactly ¼ cup. Slowly pour the lye into the water, stirring as you go. Stand back while you stir to avoid the fumes. When the water starts to clear, you can allow it to sit while you move to the next step.

Step 2

In the pint jar, add your three oils together. They should just make a pint. Heat in a microwave for about a minute, or place the jar of oils in a pan of water to heat. Check the temperature of your oils – it should be about 120° or so. Your lye should have come down by then to about 120°. Wait for both to cool somewhere between 95° and 105°This is critical for soap making. Too low and it’ll come together quickly, but be coarse and crumbly.

Step 3

When both the lye and oils are at the right temperature, pour the oils into a mixing bowl. Slowly add the lye, stirring until it’s all mixed. Stir by hand for a full 5 minutes. It’s very important to get as much of the lye in contact with as much of the soap as possible. After about 5 minutes, you can keep stirring or you can use an immersion blender (like this). The soap mixture will lighten in color and become thick. When it looks like vanilla pudding it’s at “trace” and you’re good to go. (Watch this video to see what trace looks like.)

Step 4

Add your herbs, essential oils or other additions at this point. Stir thoroughly to combine. Pour the mixture into mold(s) and cover with plastic wrap. Set in an old towel and wrap it up. This will keep the residual heat in and start the saponification process. Saponification is the process of the base ingredients becoming soap.

Step 5

After 24 hours, check your soap. If it’s still warm or soft, allow it to sit another 12-24 hours. When it’s cold and firm, turn it out onto a piece of parchment paper or baking rack. If using a loaf pan as your mold, cut into bars at this point. Allow soap to cure for 4 weeks or so. Be sure to turn it over once a week to expose all the sides to air (which is not necessary if using a baking rack). For a DIY soap drying rack, I took an old potato chip rack and slid cardboard fabric bolts (from a fabric store) through the rungs.

Step 6

When your soap is fully cured, wrap it in wax paper or keep it in an airtight container. Hand made soap creates its own glycerin, which is a humectant, pulling moisture from the air. It should be wrapped to keep it from attracting dust and debris with the moisture.

Notes

When you’re done making soap, always clean your equipment that has been exposed to lye. You can neutralize the lye with white vinegar, then wash the equipment well as you normally would. For the rest of it, let it sit for several days. Why? Because when you first make soap, it’s all fat and lye. You’ll be washing forever and you could burn your hands on the residual lye. If you wait, it becomes soap and all it takes to clean it is a soak in hot water.
For pictures and other information on cold process soap making, check out our other homemade soap article here.

How To Make Soap Video Tutorial

 
Well, what are you waiting for? Now that you know how to make soap, GO MAKE SOME!
I promise you’ll love your homemade soap.
*******
Sources
  1. Soap: FAQs. FDA U.S. Food & Drug Administration. November 2017.
Shares28k
PAID ENDORSEMENT DISCLOSURE: In order for us to support our website activities, we may receive monetary compensation or other types of remuneration for our endorsement, recommendation, testimonial and/or link to any products or services from this website.
DISCLAIMER: Information on DIY Natural™ is not reviewed or endorsed by the FDA and is NOT intended to be substituted for the advice of your health care professional. If you rely solely upon this advice you do so at your own risk. Read full Disclaimer & Disclosure statements here.

Comments

  1. I’m a beginner soap maker just for my own family’s use. I love your blog. A question…whether I decide to use milk cartons or silicone moulds or plastic containers what’s best to use as a liner/barrier? I’ve read everything from parchment paper to wax paper to Vaseline to olive oil. Sorry if this has been answered before… I’ve read lots of your followers comments but didn’t finish. You have quite an audience. Thanks and keep soaping!
    (I’m from Canada so for the long winter I’m going to give this soap making a go)
  2. Hi,
    your tutorial has inspired me to try this, I wondered how much whey/coffee/kelp powder I would add to the batch? and will it come out clear if I add nothing but just scent? sorry to be a pain but nothing here in the UK seems as helpful as your article. thank you Christine.
  3. Hi I made your soap and it turned out great. I was wondering if I can use cocoa butter in place of any of the ingredients for a chocolate smell and if so which ingredient do I replace? Would the measurement remain the same?
    Hillary
  4. I note that in the recipe it speaks to mixing the solid lye with water. As regards the fumes made in this process; these should not be inhaled. Work in a well ventilated area. Lye is caustic and some of it will be in the fumes resulting when the lye is added to the water – they can burn the throat and they should certainly not be inhaled. I taught chemistry so have a background in his matter.
    • That is correct Peter. The fuming only lasts 30 seconds to a minute, but the area should be well ventilated. I keep my face turned away then leave the room for a few minutes after it’s mixed. You can use a mask if you like.
      • Do you have any tips on how I can incorporate fennel leaves and rosemary from the back garden into your recipe? Should I infuse them into an oil, or infuse them into a tea, or chop and add straight in?
  5. I think reading the method of making soap, has made my mind quite clear about the method of making soap, will try and let you know.
    • Once you try it Meena, you’ll never go back to store bought. I have a lot of soap all over the house and I still make more! Just remember to use lye in pellet form, not flakes, measure correctly and have all your oils liquid when you measure. Those are the most important things.
  6. Hey Debra! I can’t wait to start making soap and move to a remote area of the world and just revel in the purity of making my own hygiene and beauty products. There is definitely something to being able to rely on yourself like that! Just need to wait for my kiddos to be a little older to start playing with lye!
    • You are so right about that Sarah! I don’t buy much of anything anymore. I do still buy conditioner for my hair, but I’m working on that now. Maybe someday I’ll be totally self sufficient!
  7. Thanks for the recipe! If I plan to add honey into the soap, do I need to compensate for the added liquid by removing some water?
    • Honey is tricky, Gabby. I usually add a tablespoon or so at the trace, after I’ve warmed it a bit. I don’t cut the water at all since it’s only a tablespoon. But…if you add too much, the sugars will heat the soap too much in the first few hours and could cause volcanoing. Not sure if that’s a real word, but you get the picture. I’ve tried honey powder, and it seems to cut down on it some, but the soap turned dark and got even darker over time. And your soap can stay sticky since honey is a natural humectant.
    • If you live in the Asheville, North Carolina area, Diana, I teach private lessons and at a local community college. If you don’t live near here, check out community colleges and adult educations systems in your area.
  8. Enjoyed your soap making directions & comments. I also have experienced great and dismal batches of soap. Your article has encouraged me to jump into soap making again. Thank you! Can you share what olive oil you recommend? Extra-virgin? Pure?
    • Hi Shelagh! I tend to use cheaper olive oils as I find they have more fat to them. Look at the nutritional label on the back of the bottle. It should have 14 grams of fat per serving. Any less, and the soap may not turn out right. You can use virgin or extra virgin if you like, but make sure it has enough fat. Also, make sure that the olive oil you’re looking at is 100% olive oil. There are many out there that aren’t. Buy a trusted brand!
  9. Hi,
    Thank you for this informative article. You’ve made the process really simple. I wanted to know how much the quantity of lie should be if it’s in powder/crystal form. I’m guessing the quantity you e mentioned here is that of liquid lye. TIA!
    • Hi Nina! I always use bead form in the lye. If you use liquid or flake form, it won’t measure right. If you can’t get it in bead form, you’ll need to use a lye calculator like soapcalc.com or one of the many available online. Because this is a small amount of soap being made, even a small miscalculation can result in soap that doesn’t turn out.
  10. Hi there, i am so exited about making this, but i just wanted to clarify. When you say 90-120 degrees, are you talking Celsius or Fahrenheit? Many thanks 🙂
    • Sure, Krista, I do it in my classes all the time. Just be sure that either you double or triple the recipe to bring the volume up or get a crock pot that heats on the sides. Most heat on the bottom resulting in an uneven cook.
  11. This soap looks pretty great, but I’m interested in a highly moisturizing liquid soap, sort of like some of the Dove soaps. I was wondering if I could get what I want by under-saponifying a lotion recipe with KOH, since both recipes commonly use coconut oil, a liquid oil, and often shea/cocoa butters for the lotions. What do you guys think?
  12. Hi! I just found your site and I LOVE it!! Thanks for all this amazing information!
    I have a coupld of questions about making goat’s milk soap. Would you substitute the goat’s milk for the water? And raw goat’s milk is best, correct? Thanks again!
    • You can, Angela! I’ve done it many times. Check out my Goat’s Milk Soap recipe on here for more info. I keep the milk frozen, then work the lye in small amounts until it’s all dissolved. It will look chunky, but that’s just the fat in the milk turning into soap. Once it hits the stick blender, it will all smooth out. And yes, I prefer raw goat’s milk when I can get it.
  13. I was wondering if it is possible to use fragrance oils rather than essential oils? Will that affect the end product in any way, aside from it not being totally natural (synthetic fragrances and all)?
    • We’re not sure, we don’t use fragrance oils. We suggest you either give it a shot and let us know, or just invest in some essential oils. Hope this helps!
      Blessings,
  14. I’d love to try this recipe! I was just wondering, about how much of an essential oil would you use for a batch this size? Thanks so much!
  15. Always good posts – thank you. A couple of comments, if you are going to go by cup measurements then it would be better to only have 1/2 cup of water. This should allow trace faster and not so long in the mold.
    For Brenda – soap can only be made with lye. If there is no lye then it is a synthetic detergent and that is more drying for the skin. Glycerine is a by product of soap making and in china they make huge batches of soap just to extract the glycerine for use in cosmetics. All natural soaps are glycerine soaps.
    I hope this helps.
  16. I HAVE VERY DRY SKIN AND DO NOT WANT TO USE OR DEAL WITH LYE. DO YOU HAVE A GLYCERINE SOAP RECIPE? THANKS B
  17. Please I would love if you could give a recipe on homemade acne fash wash or acne bar soap. Most of my clients are looking for soap that will help reduce/eliminate acne and fade off acne scars through constant usage. Thanks
    • There are a lot of things you can add, Judie. I use calendula, lavender, tea tree and vitamin E. Calendula can help too heal and reduce redness, lavender and tea tree can be healing and vitamin E can help to reduce scarring.
  18. I have made two batches of homemade soap. I have issues with reaching trace. The first batch I ever made I was really excited and decided I would just mix it by hand. After 45mins of not reaching the consistency of trace, my tired arm just gave up and poured into my molds. I knew it would finish reacting eventually so I let it sit in the molds for a long time. Turned out fine. My second batch I had purchased a cheap hand blender on black friday(I couldn’t bear the expense of a dedicated immersion blender just for soap – my family wouldn’t use enough to justify the expense). I thought the handblender would be enough. I got bored after a half hour of waiting and just poured into molds. It works and makes fine soap, but I just question the process. Any tips?
    • Hi Leslie! to get quicker results, a good immersion blender is essential. Mixing by hand will usually take an hour or so, depending on the oils used. I did a batch of 100% olive oil soap once that took 3 days to trace! And a hand blender just doesn’t get the speed necessary to get soap to trace quickly. Consider it an investment. I got one a Big Lots not long ago for $12. You can get them for less than $30 in most places.
  19. I absolutely love when your blog pops up in my email! I need some help though. I’ve read this tutorial many times and feel like I’m missing something. Does the lye and water solution heat up by chemical reaction? I don’t see how/when it will get above 120° unless by chem reaction. What am I missing?
  20. Hello. I love all tutorials and remedies I get from you. But I never want to use lye in my soapmaking. Haven’t had a good experience with it so I’m sticking to melt and pour. But I’d Like to know if olive oil gives the same hardness as it does for cold process. Thanks
    • Olive oil makes a hard bar in cold process, but adding it to melt and pour soap will make it softer and diminish the lather. You can try to melt some wax in it, but that usually doesn’t work either. Remember that melt and pour soap started out as cold process, then got cooked down with alcohol and sugar to refine it into a clear soap. What you start out with for the oils will be similar in the end result. It’s just easier to use because the lye has been worked out of it and it’s easier to get the herbs and oils to come out the way you want.
  21. Thanks for the article! If you want to use ground oatmeal as an additive, how much would you suggest adding? Also, how many bars of soap does one batch make?
  22. Thanks again for a wonderful tutorial on soap making.This recipe seems incredible easy. Matt and Betsy always have a wonderful surprise for their subscribers. Thank you guys! really appreciate the love.
  23. I have made soap using the hot and cold methods, but would like to try making it the old fashioned way, with animal fat and lye from ash. I know this will be more complicated and time consuming, and I may only do it the once (it will take me years to use up all the soap I have made so far anyway :), but I would like to try. Has anyonw tried this? Do you have suggestions for websites, resources I should consult before I start? So far I have only looked at the info in “Foxfire” a series of books about old fashioned ways to do all kinds of things, but I plan to do more research before I try it this summer, outside.
    • try countryfarm-lifestyles.com , they have a good tutorial for making your own lye with stove ash and then turning it into soap. Enjoy!
  24. Thanks for the info!! I have a freezer full of raw goat milk from milking two lamancha goats all summer so I made my first batch of goat milk soap with coconut oil and olive oil! It turned out great! I am eager to try new recipes!
    • I just got some pygmy goats milk from my manager at work. I can’t wait to try it. The last goat’s milk I tried came from Nubians. While it’s similar, the pygmy milk is higher in fat, much like the LaMancha.
  25. Great information! I make soap as well, although I am addicted to the hot process method because I’m so impatient to try out the blends I invent. I take a little extra precaution and mix my NaOH with my liquid in my garage with the door open since fumes are released initially. My favorite natural soap is the Castile I make with 100% olive oil, although this will not suit everyone. It is especially good for my dry type of skin. Other oils and butters that I find favorable are castor, sweet almond, grapeseed, cocoa butter and Shea butter.
    • Don’t you use sweet potatoes as one of the ingredients ,Debra? ,if in other cases you use how do you integrate it to that soap dear,I appreciate your efforts .Thanks
  26. I thought they always recommend that you weigh out your ingredients? Would 2/3 cup of liquid coconut oil weight more than 2/3 cup of solid coconut oil depending on how stiffly you compress the solid coconut oil into the measuring cup?
  27. Thank you for this simplifying tutorial. I have been wanting to try to make cold-process soaps for a long time, especially since we raise milk goats. I just haven’t had the courage to put out the initial investment. Thanks for making the decision a little easier.
    • I had the same problem when I started Bethany. I didn’t want to put out a lot of money if it didn’t turn out right. That’s one of the reasons I created this super easy recipe. I hope it goes really well for you!

Natural Living Made Easy. Sign Up for Tips, Recipes, and More!

  • You will receive both educational newsletter emails, and promotional emails, at no cost to you!
  •      
    All rights reserved. No content on this site may be reused in any fashion without written permission. By using this site, you are agreeing to the site’s terms of use. DIY Natural™ is a trademark of The Jabs Group, LLC.
    AN ELITE CAFEMEDIA HOME/DIY PUBLISHER

    No comments:

    Powered by Blogger.